For many surveys, creating assignments one by one will be a tedious and time intensive task. To help speed up your work, Survey Solutions allows you to batch upload many assignments at once using a tab delimited. Follow the steps below to perform a batch upload of assignments:
Step 1
Create a tab-delimited file with the identifying information for your
assignments
Before performing an interview, data collection teams must know the name
(e.g., name and surname of the head of household) and/or location (e.g.,
region, county, district, neighborhood) of who they should be
interviewing. To facilitate locating the respondents, this identifying
information will appear on the dashboard of enumerator app for each
interview for which they are responsible.

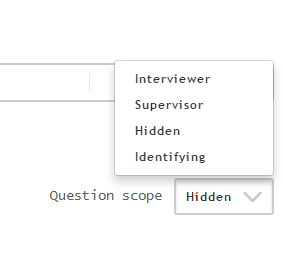
When designing the questionnaire template, each of the identifying variables that you want to appear on the dashboard should be designated as Identifying. To do this, select Identifying as the scope of the question.
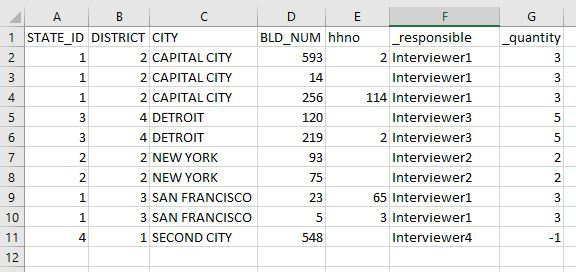
After creating the questionnaire, you must define the sample for fieldwork. Create a tab-delimited (.tab) file where every column corresponds to a variable designated as Identifying and every row—to an assignment. You can leave some ***Identifying ***information blank for any assignment. Any identifying information left blank can be filled out by the interviewers.
Step 2
Specify the person responsible for the assignment and the quantity of
interviews per assignment
Add a column titled _responsible and populate the fields with the
appropriate supervisor or interview usernames to avoid having to create
and upload a tab-delimited file for each interviewer or supervisor.
Add a column titled _quantity and populate the fields with the
maximum number of interviews you want per assignment. To specify an
unlimited quantity, put ‘-1’ in the column. If you do leave the field
blank or if there is no _quantity column in your tab delimited file,
then the quantity of interview will automatically be set to ‘1’ per
assignment.
Step 3
Upload the sample to your server
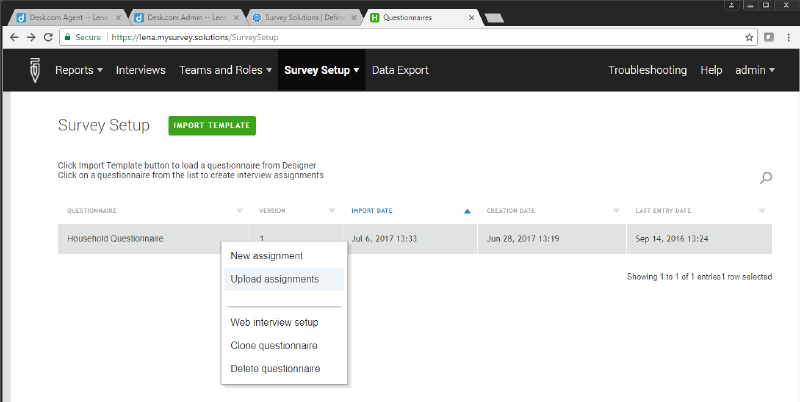
The first step is to click on the Survey Setup tab and select
Questionnaires. Then, click on the questionnaire template for
which you would like to upload the sample. Once the list of options is
displayed select Upload assignments.
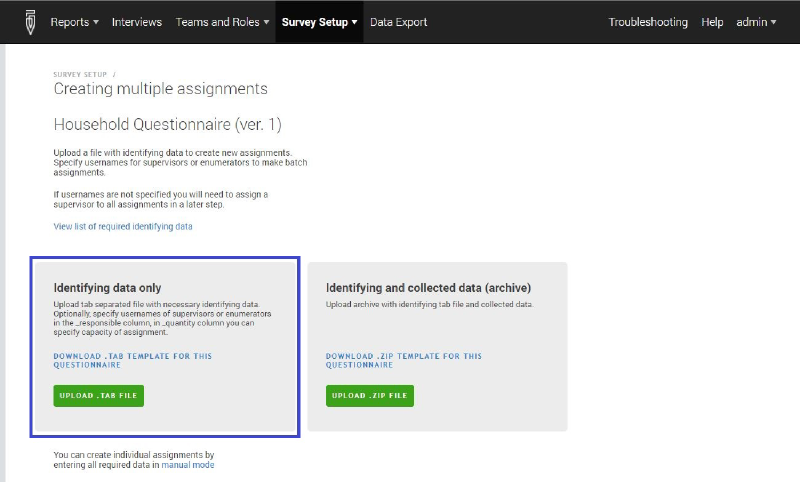
Afterwards, click the Upload .tab File button to select the .tab file that defines the sample. If you want a template of the identifying variables and what the .tab data file should look like for the questionnaire template, then click on Download .tab Template for this Questionnaire.
Step 4
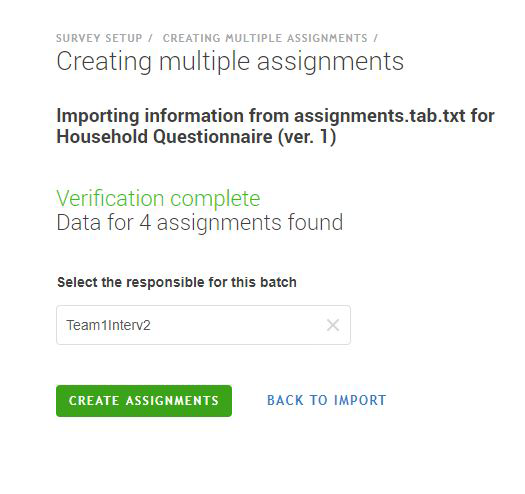
After the server has verified the data in .tab file has no errors, you will see a screen that says “Verification Complete”. If you have not added a _responsible column to your tab-delimited file, you will need to choose the supervisor responsible for these interviews. After selecting the responsible supervisor or interviewer, click on the Create button. You will need to prepare a separate .tab file for each supervisor or interviewer if you do not include a _responsible column in the .tab file.
If there are errors in your .tab file, then it will list what the errors are. Once you have fixed these errors, you can try to upload the .tab file again. Error messages are self-explanatory for most cases, but when it is not obvious you can refer to the preloading troubleshooting article explaining the nature of these errors.